

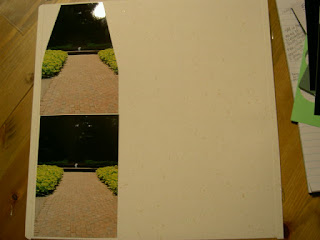
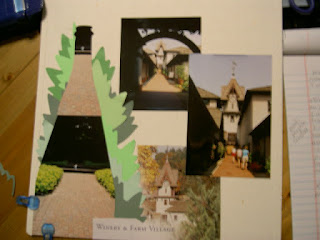
We had a cookout yesterday for Adam's birthday. As customary after we entertain, I get my stash out of "hiding" again. I go through my pix and separate the next group, which is of the Winery Tour & Tasting. I separate these pix into four groups and plan approximately 3 - 4 per page. The first group is arriving at the Winery. One pic is of the fountain in front, which is kind of drab (not exactly Old Faithful here). So, I'm thinking of turning it, along with one of its twins, into a border of sorts or cropping the pictures along the lines of convergence (also known as orthogonals). (image 1)
Inspiration strikes me and I think the fountain bubbling up mimics a bottle of bubbly being uncorked, so I search for ways to turn my pic into the shape of a wine bottle. I think of some of the cutting patterns I have. They are in a basket on the buffet. I set my laptop on the basket earlier, so I grab the handle of my laptop case without checking to make sure the bottom flap is fastened. It isn't. Before I can react, the laptop drops out of the case and lands squarely on my middle toe on my left foot. OUCH! I try to refrain from cursing and simultaneously pray that the laptop is not broken or altered in any way. I get some ice on my toe and take a short break from scrapping (image 2).
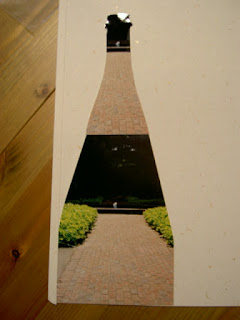
"All in the name of scrapbooking," Kathy says, laughing. "Yes," I concur, "creativity comes with a price." While I'm nursing my toe, Kathy suggests I use a piece of background paper with a wine bottle on it, trace the outline on a thin piece of paper, then use it as a pattern to cut out the shape onto my picture. I work on this while the ice rests on my toe. The outcome is really better than I expected (image 3). Unfortunately, I can't say the same for my toe.
We take a lunch break (cookout leftovers!). Adam gets ready and leaves for work, and I put Summer down for a nap then get back to scrapbooking. I decide to put some type of background behind the "bottle" and I'm sure I want it to be green, so I rifle through my stash of paper and find three shades that would work. However, I don't want the background to just be an outline of the bottle, so I think I'm going to try to outline the shapes of leaves to mimic the plants in the picture. Fortunately, I have a stencil for this that I received as a giveaway at a previous CM event, so I get to work.
It takes me quite a while to cut the leaves and arrange them in a natural fashion. To get them just right, I lay them all down and clip the bottom of the picture bottle to my page with the Multipurpose Clips so it remains still. I mark with a pencil on the page where each leaf will rest and number them in the order of adhesion. Right about this time, Kathy leaves to go to Wegman's with a friend in Owings Mills. "Hope you get done before Summer wakes up. See ya Wednesday for Crop Club," she says.
Once I have the order worked out, I adhere everything to the page with Tape Runner. I add a few foam dots under a few of the leaves to give the border some relief. It's not perfect, but I achieve the desired effect (image 4).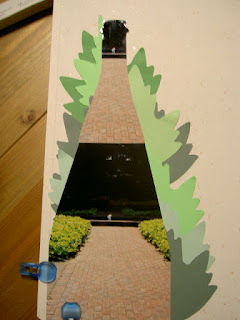
Now that that is finished, I turn my attention to the rest of the page. I have an image from one of my brochures that I want to use here. I've already cut that out with the Multipurpose Scissors so I play with the layout a bit. I really don't want to cut up the piece from the brochure anymore so I try to get it to wrap around the "bottle" and the leaves. A bit of the edge is still visible behind the leaves and I want it to appear more seamless, so I cut an edge from one of the leaf outlines and plan to paste that on at the end (images 5 + 6).

I consider rounding the corners of my photos using the Corner Rounder, but only if I don't mat them. I test a mat behind the second pic and quickly realize that it will overlap too much with the image from the brochure. Summer's awake so I break and will pick up later this evening.
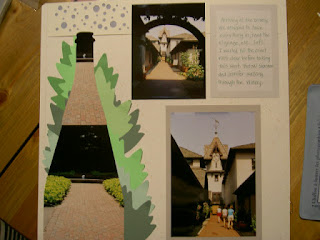
Summer's now asleep for the night and the dishes are done, so I return to the page. While I was giving Summer her bath this evening, I changed my mind about putting the cutout from the brochure on this page because I remembered I had a black and white postcard to use with the Winery pics. It will fit nicely with the cutout and a journal box. That leaves me with two pictures, room to do bubbles at the top and some journaling.
I work on the bubbles first. I cut a strip of French Vanilla paper and punch bubblesd using the Bubble Maker on the left side of the strip. Then, I apply Tape Runner around the holes and affix scraps of Fog paper to the back. This gives the allusion that the bottle has just been opened (image 7).

I decide to mat the bottom photo and add a journaling box at the top from Cottage Storybox. I jot down a couple of captions on teh box with the Patina Metallic Pen. (I tested two other green colors but like Patina best.) I adhere everything to the page, wipe down the pix with the polishing cloth, slide on a Page Protector and done (image 8)!


0 comments:
Post a Comment
Talk to me. Tell me what you think! Got a burning question? Ask me!